It was supposed to be a quiet Sunday afternoon. Just me, a cup of coffee, and the goal of finally getting my classic lemon bars recipe right. But then my neighbor, Linda, knocked on the door. She didn’t come over for small talk. She came over because she saw me dragging a baking sheet onto the porch and she smelled the citrus hitting the oven.
Before I could even say hello, she was asking if she could buy a slice. Not a whole batch. Just one. But I knew Linda. If she bought one slice, she’d be back at 6 PM asking if there were any leftovers. That’s when I realized something important: these aren’t just lemon bars. They’re social currency.
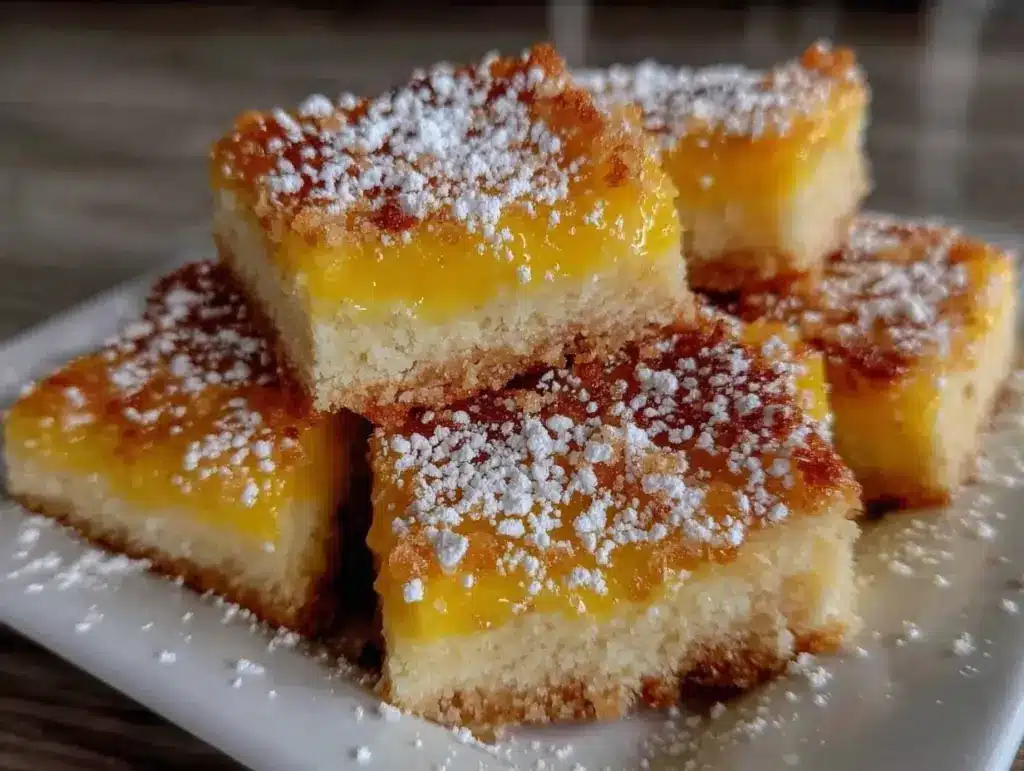
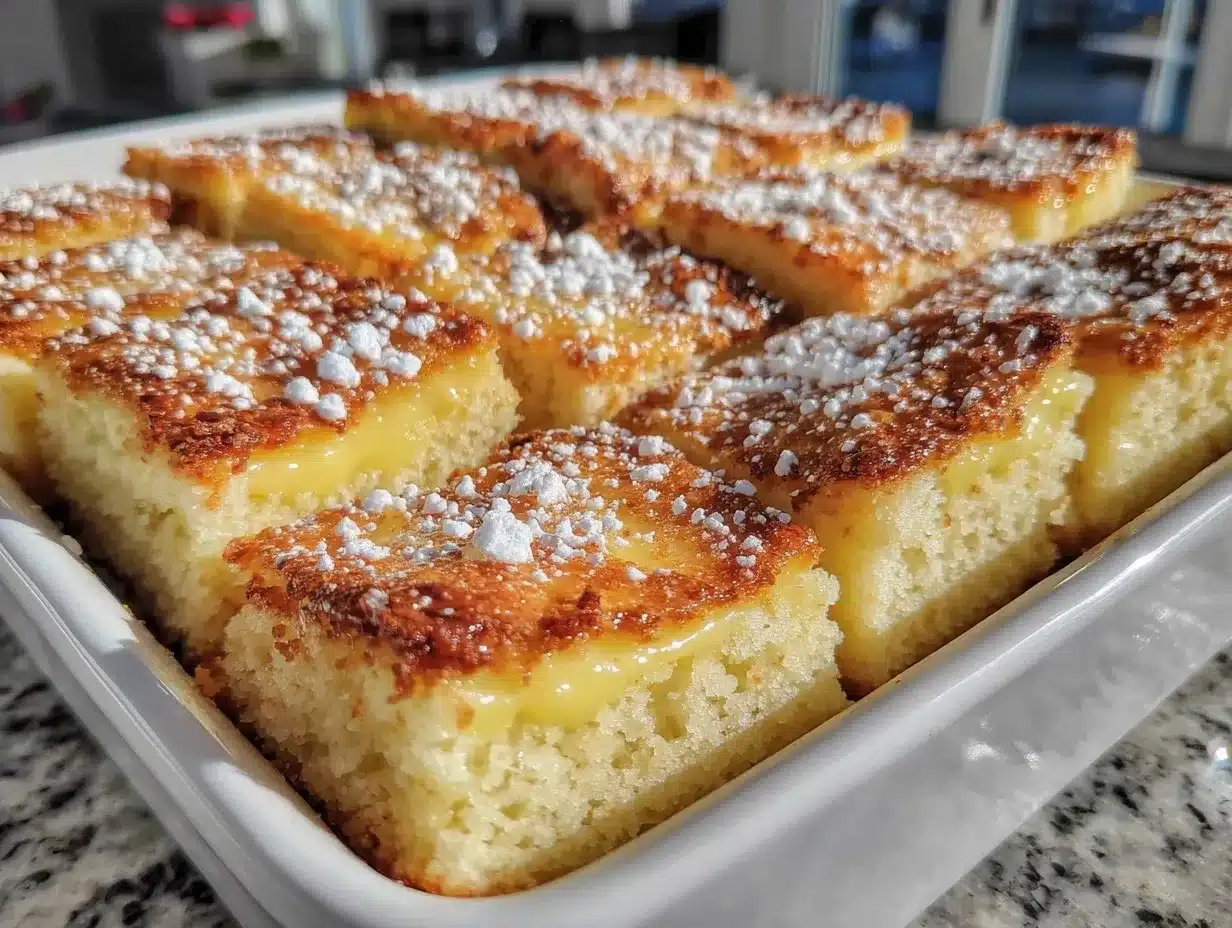
There is a specific kind of magic that happens when you combine a tangy, bright lemon custard with a rich, crumbly shortbread base. It’s the kind of dessert that makes people close their eyes for a second after the first bite. It’s the kind of treat that gets scraped off the plate with a fork, leaving only a thin layer of yellow custard clinging to the crust. I’ve made these bars for holidays, for potlucks, and for those “I just need a hug” days. And every single time, the result is the same: an empty pan and a dozen people asking for the recipe.
I’ve tested this version over and over—sometimes failing, sometimes burning the edges, sometimes forgetting to zest the lemons (a crime in my book). But after dozens of attempts, I’ve landed on the perfect ratio. It’s buttery without being heavy, tart without being sour, and sweet in that perfect, balanced way that doesn’t leave you feeling sluggish. If you’ve been searching for the best lemon bars with a shortbread crust, stop looking. This is it.
Why You’ll Love This Shortbread Crust Lemon Bar Recipe
Look, I get it. There are a million lemon bar recipes out there. Some use graham crackers. Some use a cookie dough base. Some skip the crust entirely. But here’s the thing: nothing beats a true shortbread crust for texture and flavor depth. It’s sturdy enough to hold the juicy filling but tender enough to melt in your mouth. Here’s why this recipe has become my go-to for every gathering:
- Texture Heaven — The contrast is everything. You get that initial crunch from the buttery shortbread, followed by the smooth, silky slide of the lemon curd. It’s not mushy. It’s not dry. It’s perfectly structured.
- Make-Ahead Friendly — This is my secret weapon for hosting. I can make these bars two days before a party, store them in the fridge, and they actually taste better the next day as the flavors meld. No stress on the day of.
- Visually Stunning — Dusted with powdered sugar, these bars look elegant and professional. They photograph beautifully (perfect for Pinterest) and look fancy enough for a dinner party but casual enough for a picnic.
- Perfectly Balanced — Too many lemon bars are just sugar and lemon juice. This version uses enough butter and egg yolks to create a rich, custard-like filling that feels indulgent without being cloying.
- Gluten-Free Option — The shortbread crust is naturally gluten-free if you use GF flour, making this a safe bet for guests with dietary restrictions. I often serve these alongside my gluten-free lemon olive oil cake to give guests variety.
Whether you’re hosting a weekend dinner party or just craving a sweet treat with your afternoon coffee, these bars deliver. They’re shareable, impressive, and utterly delicious.
Ingredients You’ll Need
Before we dive in, let’s talk about what goes into these bars. I’m particular about a few key ingredients because they make or break the texture. You don’t need anything exotic, but you do need quality.
For the Buttery Shortbread Crust
Unsalted butter (1 cup / 226g) — This is non-negotiable. Use high-quality European-style butter if you can find it. It has a higher fat content and a richer flavor. Room temperature is crucial here; it needs to be soft enough to cream but not melted.
Powdered sugar (½ cup / 60g) — Also known as confectioners’ sugar. Make sure it’s sifted if it’s clumpy. This dissolves into the butter to create a tender, melt-in-your-mouth crust.
All-purpose flour (2 cups / 250g) — Standard flour works perfectly. For a gluten-free version, use a 1-to-1 baking flour blend like Bob’s Red Mill or King Arthur Measure for Measure. Don’t use almond flour alone; it won’t bind the same way.
Salt (½ teaspoon) — A pinch of salt is essential to balance the sweetness. Don’t skip it.
Vanilla extract (1 teaspoon) — Pure vanilla adds a warm, aromatic note that complements the lemon beautifully. Avoid imitation vanilla.
For the Tangy Lemon Filling
Granulated sugar (1 cup / 200g) — This provides the sweetness and structure. Don’t reduce this too much, or the bars won’t set properly.
Fresh lemon juice (½ cup / 120ml) — Yes, fresh. Bottled juice tastes metallic and flat. You’ll need about 3-4 large lemons. If you’re short on time, you can check out my frozen strawberry lemonade slushie recipe for a fun drink, but for baking, always squeeze fresh.
Lemon zest (2 tablespoons) — Use organic lemons if possible, as you’re eating the peel. Zest before you juice! You want those tiny oil pockets of flavor.
Eggs (4 large) — Room temperature eggs mix more evenly into the batter. Cold eggs can cause the filling to curdle slightly.
Heavy cream (2 tablespoons) — This adds richness and helps create that custard-like texture. Don’t substitute with milk; you’ll lose the silky mouthfeel.
Optional: Extra powdered sugar — For dusting on top.
Equipment Needed
You don’t need fancy gadgets for this. Here’s what I actually use:
9×13-inch baking pan — I use a metal pan, not glass. Metal conducts heat better, ensuring the crust bakes through evenly. Line it with parchment paper, leaving an overhang on the sides. This is crucial for lifting the bars out later.
Mixer — A hand mixer or stand mixer makes creaming the butter and sugar much easier. But you can do it by hand if you have strong arms.
Zester or Microplane — A microplane gives you the finest zest, which distributes better in the filling. A box zester works too, just chop the zest finely.
Whisk — For blending the filling ingredients until smooth.
Offset spatula — For spreading the filling evenly over the crust.
Cooling rack — Essential for cooling the bars completely before cutting. Hot bars will crumble.
How to Make It: Step-by-Step
Alright, let’s get baking. This process is straightforward, but timing matters.
Step 1: Prep Your Pan and Oven
Preheat your oven to 350°F (175°C). Line your 9×13-inch baking pan with parchment paper. Leave a generous overhang on the long sides—this acts as a sling to lift the finished bars out of the pan. Grease the parchment lightly with butter or cooking spray.
Step 2: Make the Shortbread Crust
In a large bowl, beat the room-temperature butter and powdered sugar together until light and fluffy, about 2-3 minutes. Add the vanilla extract and salt. Gradually add the flour, mixing on low speed until just combined. The dough will look crumbly at first, but it should hold together when pressed.
Transfer the dough to the prepared pan. Press it firmly and evenly into the bottom using your fingers or the bottom of a measuring cup. Don’t worry about making it perfect; it will spread slightly. Bake for 18-20 minutes, or until the edges are lightly golden. Remove from the oven and let it cool slightly while you make the filling. Do not turn off the oven.
Step 3: Prepare the Lemon Filling
In a large mixing bowl, whisk together the granulated sugar and lemon zest. Use your fingers to rub the zest into the sugar for about a minute. This releases the essential oils and gives the filling a vibrant lemon flavor. Add the eggs and heavy cream, whisking vigorously until the mixture is smooth and pale yellow.
Slowly stream in the fresh lemon juice while whisking constantly. The mixture might look slightly curdled at first—that’s normal. Keep whisking until it’s smooth.
Step 4: Assemble and Bake
Pour the lemon filling over the partially baked crust. Use an offset spatula to spread it evenly. Return the pan to the oven and bake for 20-25 minutes. The bars are done when the edges are set and the center jiggles slightly like Jell-O but isn’t liquid. It should look puffed and golden on top.
Remove from the oven and let the bars cool in the pan on a wire rack for at least 1 hour. They will continue to set as they cool. This patience is key—if you cut them hot, they’ll fall apart.
Step 5: Chill and Serve
Once completely cool, cover the pan and refrigerate for at least 2 hours, preferably overnight. This step firms up the bars, making them easier to cut. Before serving, lift the bars out of the pan using the parchment sling. Dust generously with powdered sugar. Cut into squares using a sharp knife, wiping the blade clean between cuts for neat edges.
Expert Tips & Tricks
Here’s everything I’ve learned from making these bars dozens of times. These tips will save you from my mistakes.
Room Temperature Ingredients — This is the most important tip. Cold butter won’t cream properly. Cold eggs will shock the hot crust and cause cracking. Take your butter and eggs out of the fridge 30 minutes before you start.
Don’t Overmix the Filling — Once you add the lemon juice, mix just until combined. Overmixing incorporates too much air, which can cause the bars to rise and then collapse, leaving cracks on top.
The Jiggle Test — Trust your eyes, not just the timer. When you shake the pan, the center should move like a slow wave, not slosh like water. If it’s still liquid, give it 5 more minutes.
Chill Before Cutting — I know it’s tempting to dig in immediately, but patience pays off. Chilled bars cut cleanly. Warm bars are a mushy disaster. Plan ahead.
Zest First — Always zest your lemons before juicing. It’s much harder to zest a peeled lemon, and you want to avoid getting any white pith in your sugar.
Cracks Happen — If your bars crack on top, don’t panic. It’s usually due to oven temperature fluctuations or overmixing. Dusting with powdered sugar hides most cracks. If you’re worried, lower your oven temp by 25°F.
Variations & Substitutions
Once you’ve nailed the basic version, here’s how you can mix it up. I’ve tried all of these.
Blueberry Lemon Bars — Fold 1 cup of fresh or frozen blueberries into the filling before baking. The berries burst slightly, creating beautiful purple swirls. Just note: this adds moisture, so you might need an extra 5 minutes of baking time.
Coconut Lemon Bars — Add ½ cup of shredded coconut to the crust dough. It adds a nice tropical twist and extra chewiness. The filling stays the same.
Lavender Lemon Bars — Add 1 teaspoon of dried culinary lavender to the sugar and zest mixture. It’s subtle and floral, perfect for spring gatherings. Strain the lavender out if you don’t want bits in your bars.
Meyer Lemon Bars — If you can find Meyer lemons (which are sweeter and more aromatic than regular lemons), use them! You might want to reduce the sugar by 2 tablespoons since Meyer lemons are less tart.
Gluten-Free Version — As mentioned, use a 1-to-1 gluten-free flour blend for the crust. The filling is naturally gluten-free. The texture might be slightly more tender, but it’s delicious.
Vegan Option — This is trickier. Replace butter with vegan butter, eggs with a flax egg (4 tablespoons ground flax + 12 tablespoons water), and heavy cream with coconut cream. The texture will be different, but it’s still tasty. I haven’t perfected this version yet, but it’s worth experimenting with.
Serving & Storage
These bars are versatile and travel well, making them perfect for any occasion.
How to Serve — I usually serve these at room temperature or slightly chilled. They pair beautifully with a cup of hot tea or coffee. For a dinner party, I arrange them on a platter with fresh mint leaves and extra lemon slices for garnish. They also go well with my charred lemon grilled chicken for a light, citrus-themed menu.
Side Dishes — These bars are rich, so I often serve them with a simple green salad or some fresh berries to balance the meal. They’re also great alongside a glass of cold milk or a slice of creamy mango lassi for a refreshing contrast.
Storage Instructions — Store leftover bars in an airtight container in the refrigerator for up to 5 days. They actually taste better after a day or two as the flavors meld. You can also freeze them for up to 3 months. Wrap individual bars in plastic wrap, then place them in a freezer-safe bag. Thaw in the fridge overnight before serving.
Pro Tip — If you’re bringing these to a potluck, transport them in the pan lined with parchment. It’s easier to carry and less likely to break than individual slices.
Nutrition Information
I’m not a nutritionist, but here’s the breakdown if you’re tracking. Keep in mind that these are rich, indulgent bars, so portion control is key.
Per Serving (based on 16 bars):
- Calories: 280
- Protein: 3g
- Carbs: 38g
- Fiber: 1g
- Sugar: 28g
- Fat: 14g
- Saturated Fat: 8g
- Cholesterol: 55mg
- Sodium: 120mg
What’s Good: The shortbread crust provides some satisfaction, and the lemon adds a vitamin C boost. What to Know: These are high in sugar and saturated fat due to the butter and sugar content. Enjoy them as a special treat rather than an everyday snack. If you’re watching your sugar intake, consider making smaller squares.
Final Thoughts
So that’s my go-to lemon bars with a buttery shortbread crust! I’ve probably talked your ear off at this point, but when you make a recipe this often, you have a lot to say about it.
This recipe has saved my social calendar more times than I can count. It’s my answer to “what can I bring to the party?” when I want to impress without spending hours in the kitchen. My family loves them, my friends beg for them, and I love making them because they’re forgiving and delicious.
Make it yours! Try different toppings, swap in seasonal fruits, or adjust the lemon intensity to your taste. The best recipes are the ones you adapt to your life. If you make these bars, drop a comment and let me know how they turned out! I love hearing how recipes work in your kitchen. And if something doesn’t work, tell me that too—I’m here to help troubleshoot.
Happy baking! And I hope your kitchen smells half as good as mine does right now.
Frequently Asked Questions
Q: Can I use bottled lemon juice?
A: You can, but fresh tastes so much better. Bottled juice often has preservatives that can affect the flavor and texture. If you must use bottled, choose one with no added sugar. But honestly, squeezing four lemons takes about 5 minutes. It’s worth it.
Q: Why did my lemon bars crack on top?
A: Cracking is usually caused by overmixing the filling (which incorporates too much air) or baking at too high a temperature. Make sure you mix the filling just until combined, and keep your oven temperature accurate. A slight crack isn’t a disaster—powdered sugar hides it well!
Q: Can I make these gluten-free?
A: Yes! Simply swap the all-purpose flour in the crust for a 1-to-1 gluten-free baking flour blend. The filling is naturally gluten-free. The texture might be slightly more tender, but it’s still delicious. I’ve tested this with several brands, and they all work well.
Q: How do I store leftover lemon bars?
A: Store them in an airtight container in the refrigerator for up to 5 days. They can also be frozen for up to 3 months. Wrap individual bars in plastic wrap and place them in a freezer-safe bag. Thaw in the fridge overnight before serving.
Q: Can I double this recipe?
A: Absolutely! Double all ingredients and use a 9×13-inch pan. If you want to make a double batch, use two pans. The baking times should remain the same. Just keep an eye on them, as ovens can vary.
Q: Why are my bars too soft?
A: This usually means they weren’t baked long enough or didn’t cool completely. The bars continue to set as they cool. If they’re still too soft after cooling, try baking them for 5 more minutes next time. Also, ensure you’re using the correct amount of flour and sugar.
Pin This Recipe!


Lemon Bars: Best Shortbread Crust
- Total Time: 1 hour 5 minutes
- Yield: 16 servings 1x
Description
These classic lemon bars feature a rich, buttery shortbread crust and a tangy, silky lemon custard filling. Perfect for parties, they are make-ahead friendly and visually stunning.
Ingredients
- 1 cup (226g) unsalted butter, room temperature
- ½ cup (60g) powdered sugar, sifted
- 2 cups (250g) all-purpose flour
- ½ teaspoon salt
- 1 teaspoon vanilla extract
- 1 cup (200g) granulated sugar
- 2 tablespoons lemon zest
- 4 large eggs, room temperature
- 2 tablespoons heavy cream
- ½ cup (120ml) fresh lemon juice
- Extra powdered sugar for dusting
Instructions
- Preheat oven to 350°F (175°C). Line a 9×13-inch baking pan with parchment paper, leaving an overhang on the long sides, and grease lightly.
- In a large bowl, beat butter and powdered sugar until light and fluffy (2-3 minutes). Add vanilla and salt.
- Gradually add flour and mix on low speed until just combined. Press dough firmly and evenly into the prepared pan.
- Bake crust for 18-20 minutes until edges are lightly golden. Remove and let cool slightly while making filling.
- In a separate bowl, whisk granulated sugar and lemon zest for 1 minute to release oils.
- Add eggs and heavy cream, whisking vigorously until smooth and pale yellow.
- Slowly stream in fresh lemon juice while whisking constantly until smooth.
- Pour filling over the partially baked crust and spread evenly.
- Bake for 20-25 minutes until edges are set and the center jiggles slightly like Jell-O.
- Cool in the pan on a wire rack for at least 1 hour.
- Refrigerate for at least 2 hours (preferably overnight) to firm up.
- Lift bars out using parchment sling, dust with powdered sugar, and cut into squares.
Notes
Ensure ingredients are at room temperature for best texture. Do not overmix the filling to prevent cracking. Bars must be chilled completely before cutting to ensure clean slices. For a gluten-free version, use a 1-to-1 gluten-free flour blend.
- Prep Time: 20 minutes
- Cook Time: 45 minutes
- Category: Dessert
- Cuisine: American
Nutrition
- Serving Size: 1 bar
- Calories: 280
- Sugar: 28
- Sodium: 120
- Fat: 14
- Saturated Fat: 8
- Carbohydrates: 38
- Fiber: 1
- Protein: 3
Keywords: lemon bars, shortbread crust, lemon dessert, baking, party food, make-ahead dessert, gluten-free option