I still remember the chaos of that first week back to school last year—scrambling to pack lunches while trying to make breakfast, all before the bus honked outside. My son, who’s notoriously picky, kept asking for the same old thing: mac and cheese. But not just any mac and cheese—he wanted it warm, creamy, and packed in his thermos so it wouldn’t turn into a sad, clumpy mess by lunchtime. Sounds simple, right? Well, turns out, getting perfect thermos mac and cheese with simple ingredients that actually hold up is trickier than you’d think.
After a handful of trial runs (and a few soggy disappointments), I finally landed on this easy homemade Back-to-School Thermos Mac and Cheese recipe. It’s creamy, comforting, and made with ingredients you probably already have in your pantry. No weird powders or mystery cheese blends—just real food that reheats beautifully in a thermos and keeps my kid happily fueled all afternoon. I’ve tested this recipe more times than I can count during school mornings, and it’s become my secret weapon for stress-free, nutritious lunches.
Here’s the thing: getting creamy mac and cheese to stay creamy hours later isn’t magic—it’s all about the right pasta, the right cheese, and a few simple tricks I’m about to share.
Why You’ll Love This Back-to-School Thermos Mac and Cheese Recipe
This recipe has totally changed how I pack school lunches around here. Seriously, it’s become our go-to for busy mornings.
- Simple ingredients you already have — No fancy cheeses or complicated sauces. Just classic staples like cheddar, milk, and elbow pasta.
- Thermos-tested and kid-approved — My son actually looks forward to this in his lunchbox, and that’s saying a lot.
- Prepares in under 30 minutes — Perfect for rushed school mornings or meal prep on Sundays.
- Stays creamy hours later — Thanks to a little extra cheese and a splash of milk, it reheats perfectly without drying out or turning gluey.
- Customizable add-ins — Need to sneak in some veggies or protein? You can easily mix in peas, cooked chicken, or even bacon bits.
- Budget-friendly — Feeds 4-6 kids for under $10. Way cheaper than buying premade thermos meals.
Honestly, this is my lifesaver for hectic mornings. It’s comfort food that works in a lunchbox, and it’s made me feel like I’m actually winning at back-to-school season.
Ingredients You’ll Need
Here’s the best part: this Back-to-School Thermos Mac and Cheese recipe uses ingredients you probably already have hanging out in your fridge and pantry. I’m picky about three things here—pasta shape, cheese choice, and milk fat content—and I’ll tell you exactly why.
- Elbow macaroni (8 oz / 225g) — Classic choice for mac and cheese. The curves hold onto sauce better than spaghetti or shells, and it reheats evenly in a thermos.
- Sharp cheddar cheese (2 cups shredded / 200g) — Use freshly shredded from a block for the best melt and flavor. Pre-shredded has anti-caking agents that mess with texture.
- Whole milk (2 cups / 480ml) — Full-fat milk makes the sauce creamy but not too heavy. Skim or low-fat tends to make it dry out in the thermos.
- Butter (3 tablespoons / 45g) — For richness and that classic mac and cheese mouthfeel.
- All-purpose flour (3 tablespoons / 24g) — Thickens the cheese sauce so it clings to the pasta.
- Salt (1 teaspoon) — Enhances all the flavors.
- Black pepper (½ teaspoon) — Adds a subtle kick without overpowering the kids.
- Optional add-ins: frozen peas (½ cup, thawed), cooked bacon bits (½ cup), diced cooked chicken (1 cup) — great for sneaking in extra nutrition or protein.
Quick note: I always shred my cheese fresh and keep a stash of elbow macaroni in the pantry for quick meals. If you don’t have whole milk, half-and-half works in a pinch but might make the sauce a little thicker.
Equipment Needed
You don’t need fancy gadgets for this. Here’s what I actually use when making thermos mac and cheese:
- Medium saucepan — For cooking the pasta. I use my 3-quart pot that fits the pasta comfortably.
- Medium skillet — To make the cheese sauce. Non-stick helps prevent burning but stainless steel works fine if you watch the heat.
- Whisk — Essential for making a smooth roux (that flour-butter mix) so your sauce isn’t lumpy.
- Measuring cups and spoons — Standard stuff. I’m not fancy here.
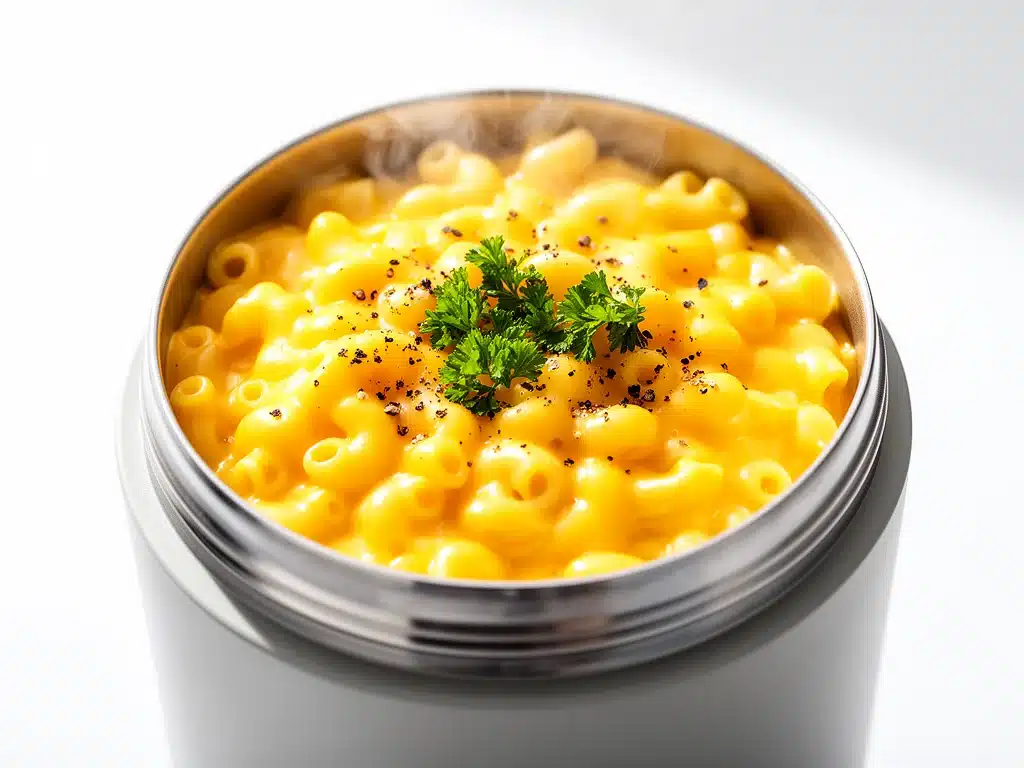
- Thermos — Obviously! Mine is a 10-ounce stainless steel thermos designed to keep food warm for hours. I’ve tried smaller and bigger sizes—10 oz is the sweet spot for lunchboxes.
Optional but handy: a cheese grater (to shred your own cheddar), and a silicone spatula (for scraping every last bit of cheese sauce out of the pan).
How to Make Back-to-School Thermos Mac and Cheese: Step-by-Step

Alright, let’s get into it! I’m walking you through exactly how I make this creamy, thermos-friendly mac and cheese, including the little tricks I’ve picked up to keep it from turning into a gluey mess.
Step 1: Cook the Pasta (8-10 minutes)
Bring a large pot of salted water to a boil (about 1 tablespoon salt per 4 quarts water). Add elbow macaroni and cook until just al dente—usually about 8 minutes. You want the pasta a little firm since it’ll soften more in the sauce and thermos. Drain and set aside.
Step 2: Make the Roux (3-4 minutes)
While the pasta cooks, melt butter in a medium skillet over medium heat. Once melted and bubbling, whisk in the flour and keep stirring for 2-3 minutes until it turns a light golden color. This cooks out the raw flour taste and forms the base for your cheese sauce.
Step 3: Add Milk and Thicken (5-6 minutes)
Slowly pour in the whole milk while whisking constantly to avoid lumps. Keep whisking and simmer over medium-low heat until the sauce thickens enough to coat the back of a spoon—about 5 minutes. You’ll see it start to bubble gently; that’s your cue.
Step 4: Add Cheese and Seasonings (2-3 minutes)
Remove the skillet from heat and stir in the shredded sharp cheddar cheese a handful at a time, whisking until smooth and creamy. Add salt and black pepper, then taste and adjust seasoning as needed. If the sauce feels too thick, add a splash of milk.
Step 5: Combine Pasta and Sauce (1-2 minutes)
Stir the drained pasta into the cheese sauce until everything is evenly coated. If you’re adding optional peas, bacon, or chicken, fold them in here.
Step 6: Pack It in the Thermos (1 minute)
Preheat your thermos by filling it with boiling water for 5 minutes, then empty it. Spoon the hot mac and cheese into the thermos, seal tightly, and you’re done! The thermos will keep it warm and creamy until lunchtime.
Total time: About 25-30 minutes, with most of it hands-off once the sauce simmers.
Expert Tips & Tricks
- Preheat your thermos: This is a game changer. I forgot this once, and the mac and cheese cooled off way too fast. Filling the thermos with boiling water warms the container so your food stays hot longer.
- Don’t overcook the pasta: It’ll keep cooking slightly in the sauce and thermos. Al dente pasta means no mushy lunches.
- Use sharp cheddar: It melts better and has more flavor than mild. Plus, the sharper taste stands up well after sitting in the thermos.
- Freshly shredded cheese only: Pre-shredded cheese has anti-caking agents that can cause a grainy sauce. I promise, grating your own only takes a minute.
- Keep the sauce thick but pourable: If it’s too thin, it’ll leak and get watery; too thick and it clumps. Adjust milk quantities as you go.
- Add-ins work great: Frozen peas thaw quickly and add color and sweetness. Bacon bits bring smoky crunch. My son loves the chicken version when I have leftovers.
- Use a good-quality thermos: Mine keeps food hot for 6 hours, which is perfect for school days.
Variations & Substitutions
Once you’ve nailed the basic Back-to-School Thermos Mac and Cheese, try these twists I’ve experimented with:
- Veggie boost: Stir in finely chopped broccoli or spinach during step 5 for extra greens. The spinach wilts quickly, and broccoli adds a nice crunch.
- Spicy kick: Add ¼ teaspoon smoked paprika or a pinch of cayenne to the cheese sauce. My husband swears by this for adults’ lunches.
- Dairy-free: Swap whole milk for unsweetened oat milk and use a dairy-free cheese alternative. The sauce won’t be quite as creamy but still tasty.
- Gluten-free: Use gluten-free elbow pasta and gluten-free flour or cornstarch for the roux.
- Protein-packed: Toss in cooked diced ham or shredded rotisserie chicken when combining pasta and sauce.
- Cheese blend: Mix in mozzarella or gouda for a different melt and flavor profile.
Serving & Storage
Serving this mac and cheese straight from the thermos feels cozy and practical. But if you want to make it a sit-down meal, serve it with a crisp green salad or roasted veggies for balance.
Leftovers can be stored in an airtight container in the fridge for up to 3 days. Reheat gently on the stove or microwave, adding a splash of milk to bring back creaminess. I don’t recommend freezing because the sauce tends to separate.
For meal prep, make the cheese sauce ahead and store it separately. Cook pasta fresh each day and combine just before packing the thermos. This keeps everything tasting fresh and creamy.
Nutrition Information
| Nutrient | Per Serving (6 servings) |
|---|---|
| Calories | 370 |
| Protein | 14g |
| Carbohydrates | 40g |
| Fiber | 1.5g |
| Sugar | 4g |
| Fat | 17g |
| Saturated Fat | 10g |
| Cholesterol | 50mg |
| Sodium | 350mg |
| Calcium | 280mg |
This recipe packs decent protein and calcium from the cheese and milk, making it more than just comfort food. It’s filling and balanced enough to keep kids energized through the afternoon. Just remember, like most mac and cheese, it’s indulgent, so I recommend pairing it with some fresh fruit or veggies for a well-rounded lunch.
Final Thoughts
So that’s my tried-and-true Back-to-School Thermos Mac and Cheese recipe! I’ve probably talked your ear off by now, but when you make something this often for your family, you end up with a lot of tips and tricks to share.
This recipe has saved more rushed mornings than I can count. It’s reliable, kid-friendly, and best of all, it actually tastes great hours later at school. My son’s been known to ask for seconds, which is a victory in my book.
Make it yours—experiment with add-ins, adjust the seasoning, or swap cheeses. The best recipes are the ones you adapt to your family’s tastes and schedule.
If you try this recipe, drop a comment below and let me know how it goes! I love hearing your kitchen wins and am here to help if you hit any snags.
Happy packing—and I hope your lunchbox smells as good as mine does right now.
Frequently Asked Questions
Q: Can I use milk instead of heavy cream for the cheese sauce?
A: Absolutely! This recipe actually calls for whole milk, which keeps the sauce creamy without being too heavy. Heavy cream would make it richer but also thicker and harder to pack in a thermos. If you only have skim or low-fat milk, the sauce might dry out faster in the thermos.
Q: How do I keep the mac and cheese warm in the thermos all day?
A: Preheating your thermos with boiling water for 5 minutes is the key. This warms the container so your mac and cheese stays hot longer. Also, pack the mac and cheese while it’s still piping hot and seal the thermos tightly. Mine keeps food warm for about 6 hours, perfect for school days.
Q: Can I make this recipe ahead of time?
A: Yes! Make the cheese sauce and cook the pasta ahead, then store separately in the fridge up to 2 days. On the morning of, gently reheat the sauce, mix with freshly cooked or reheated pasta, and pack into the thermos. This helps keep the texture and flavor fresh.
Q: Why did my sauce turn grainy or lumpy?
A: Grainy sauce usually means the cheese was added over too high heat or not whisked in properly. Always remove the pan from heat before stirring in cheese, and whisk gently off the burner. Using freshly shredded cheese also helps avoid this problem.
Q: Can I substitute different pasta shapes?
A: You can, but elbow macaroni is best for thermos mac and cheese. Its shape holds sauce well and cooks evenly. Small shells, rotini, or cavatappi can work too, but avoid long pastas like spaghetti—they don’t pack or reheat as well.
Q: How do I reheat leftover thermos mac and cheese without drying it out?
A: The best way is to warm leftovers on the stove over low heat, adding a splash of milk or water to loosen the sauce. Stir frequently until heated through. Microwave reheating works in a pinch, but add liquid and heat in short bursts to avoid drying.
Q: Can I double this recipe for meal prep or feeding a crowd?
A: Definitely! Doubling the ingredients is no problem. Just use a larger pot and skillet, and make sure your thermos or storage containers are big enough. Cooking times stay about the same.
For more comforting and easy pasta meals perfect for busy days, you might like my creamy garlic pasta or the crispy garlic chicken that also work great for weeknight dinners.
Pin This Recipe!


Back-to-School Thermos Mac and Cheese
- Total Time: 25-30 minutes
- Yield: 6 servings 1x
Description
A creamy, comforting mac and cheese recipe perfect for packing in a thermos to keep warm and delicious for school lunches. Made with simple ingredients and designed to stay creamy hours later.
Ingredients
- 8 oz elbow macaroni
- 2 cups shredded sharp cheddar cheese
- 2 cups whole milk
- 3 tablespoons butter
- 3 tablespoons all-purpose flour
- 1 teaspoon salt
- 1/2 teaspoon black pepper
- Optional add-ins: 1/2 cup thawed frozen peas, 1/2 cup cooked bacon bits, 1 cup diced cooked chicken
Instructions
- Bring a large pot of salted water to a boil (about 1 tablespoon salt per 4 quarts water). Add elbow macaroni and cook until just al dente, about 8 minutes. Drain and set aside.
- While pasta cooks, melt butter in a medium skillet over medium heat. Whisk in flour and stir for 2-3 minutes until light golden.
- Slowly pour in whole milk while whisking constantly. Simmer over medium-low heat, whisking until sauce thickens and coats the back of a spoon, about 5 minutes.
- Remove skillet from heat and stir in shredded cheddar cheese a handful at a time until smooth and creamy. Add salt and black pepper, adjust seasoning as needed. Add a splash of milk if sauce is too thick.
- Stir drained pasta into cheese sauce until evenly coated. Fold in any optional add-ins like peas, bacon, or chicken.
- Preheat thermos by filling with boiling water for 5 minutes, then empty. Spoon hot mac and cheese into thermos, seal tightly.
Notes
Preheat your thermos with boiling water to keep the mac and cheese warm longer. Use freshly shredded sharp cheddar cheese for best melt and flavor. Do not overcook pasta; al dente is best as it will soften further in the thermos. Adjust milk quantity to keep sauce thick but pourable. Optional add-ins like peas, bacon, or chicken can be added for extra nutrition and flavor.
- Prep Time: 10 minutes
- Cook Time: 15-20 minutes
- Category: Main Course
- Cuisine: American
Nutrition
- Serving Size: 1 serving (about 1 c
- Calories: 370
- Sugar: 4
- Sodium: 350
- Fat: 17
- Saturated Fat: 10
- Carbohydrates: 40
- Fiber: 1.5
- Protein: 14
Keywords: mac and cheese, thermos lunch, school lunch, creamy mac and cheese, easy mac and cheese, homemade mac and cheese, kid-friendly lunch


