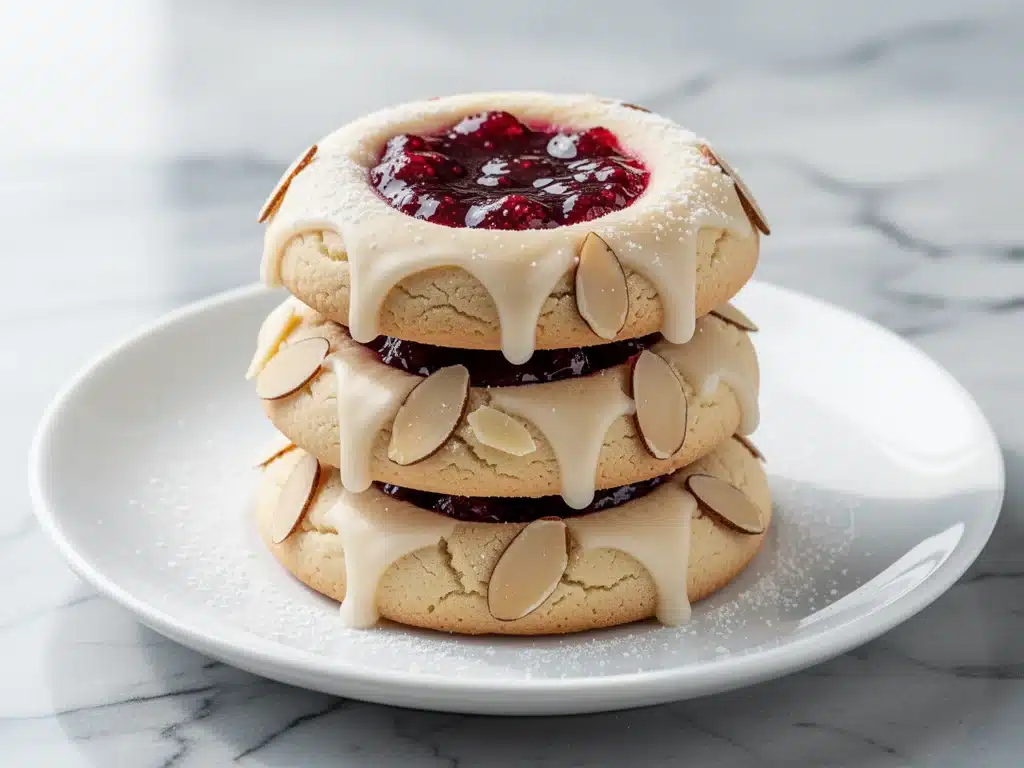
There is a specific kind of panic that sets in when you realize you need a dessert for a dinner party in forty-five minutes. I was in that exact spot last Saturday. My friends were coming over for what started as a casual get-together but quickly escalated into a proper dinner party because, well, we are adults now and we like to complicate things. I had main courses covered, but my dessert drawer was sadly lacking in anything impressive. I was staring at a bag of frozen raspberries and a jar of almond paste, and something clicked.
I’ve always been a fan of the classic thumbprint cookie, but you know how it is. Sometimes they end up dry as sawdust, or the jam leaks out and creates a mess that’s hard to clean off the baking sheet. I wanted something that felt elegant enough to serve on a nice platter but was actually simple enough to throw together when my brain was fried from chopping vegetables. So, I whipped up a batch of these buttery raspberry almond thumbprint cookies with vanilla glaze. I baked them, popped one in my mouth, and immediately texted my friend to tell her to delay her arrival by twenty minutes because I needed to get the photos right.
These cookies are not just a quick fix. They are genuinely delicious. The cookie itself is tender, rich, and has a subtle nutty crunch from the almond extract. The raspberry filling is bright and tart, cutting through the sweetness perfectly. And that vanilla glaze? It’s the cherry on top that makes them look like they came from a high-end bakery. I’ve made these at least six times in the last month—once for a bake sale, twice for family gatherings, and the rest just because I needed a cookie fix. They keep well, they freeze beautifully, and they always get compliments. If you’re looking for a dessert that impresses without the stress, this is it.
Why You’ll Love This Recipe
Let’s be real. Baking can be a lot of work. You need to clean bowls, measure ingredients, and hope the oven doesn’t burn everything. This buttery raspberry almond thumbprint cookies with vanilla glaze recipe changes the game because it balances effort with huge rewards. Here is why I keep coming back to this one:
- Zero Fancy Equipment Needed — Seriously. You don’t need a stand mixer. A hand mixer or even a sturdy wooden spoon works fine. I’ve made these with just a whisk when my mixer battery died. It’s that forgiving.
- Uses Pantry Staples — You likely have most of the dry ingredients already. The only special items are the almond extract and raspberry jam. If you don’t have raspberry, strawberry or apricot works just as well. I’m not judging.
- Make-Ahead Friendly — This is my secret weapon for hosting. You can make the dough, scoop it, freeze the unbaked cookies, and then bake them fresh when your guests arrive. They taste just as good as fresh-baked. I did this for a holiday party and my husband had no idea I’d prepped them days earlier.
- They Look Way Harder Than They Are — There is a “wow” factor here. The glaze drips down the sides, the jam looks jewel-toned, and the almond flavor smells incredible while they bake. People assume you bought these from a fancy shop. Let them think that. It’s a win.
- Perfect Balance of Sweet and Tart — Too many cookie recipes are just sugar bombs. The tartness of the raspberry jam and the nuttiness of the almond create a complex flavor profile that isn’t cloying. You can eat three without feeling guilty (okay, maybe four).
This recipe has saved me more times than I can count. It’s my go-to when I want to feel like a baking pro but don’t want to spend hours in the kitchen. It’s reliable, delicious, and always makes people happy.
Ingredients You’ll Need
Before we get to the mixing, let’s talk about what you need. I’m going to break this down into the cookie dough, the filling, and the glaze. Don’t worry, it’s not a long list, but the quality of a few key ingredients matters.
For the Cookie Dough
Unsalted butter (1 cup / 226g, softened) — This is non-negotiable. Use real butter, not margarine. Soften it properly. If you microwave it and it gets oily, start over. You want it pliable but not melted. This gives the cookies their rich, tender texture.
Granulated sugar (1 cup / 200g) — Standard white sugar. Don’t swap for brown sugar here; we want that crisp edge and light color. Brown sugar would make them too chewy and dark.
Egg yolk (1 large) — Just the yolk! The yolk adds richness and tenderness without too much structure. If you’re worried about waste, freeze the white for an omelet tomorrow. Or make creamy frozen piña colada smoothies if you want to use up extra fruit, but honestly, the yolk is key here.
Vanilla extract (1 teaspoon) — Pure vanilla, please. I know it’s pricey, but artificial vanilla tastes chemical in simple recipes like this. It’s worth the investment.
Almond extract (½ teaspoon) — This is the star flavor. A little goes a long way. Don’t skip it, but don’t double it either, or it’ll taste like marzipan. Just a hint is perfect.
All-purpose flour (2 cups / 250g) — Spoon and level your flour. Don’t scoop it directly from the bag, or you’ll pack it down and end up with dry cookies. I use a digital scale if I’m being precise, but spoon-and-level works if you’re careful.
Baking powder (½ teaspoon) — Just a tiny bit to help them spread slightly. Don’t use baking soda; there’s no acid in this dough to activate it.
Salt (½ teaspoon) — Essential for balancing the sweetness. Use kosher salt if you have it.
For the Filling

Raspberry jam (½ cup) — I use seedless raspberry jam for a smooth look. If you have fresh raspberries and some jam, you can blend them together for a fresh jam filling, but store-bought seedless is easier and looks more professional. Smucker’s or Bonne Maman are my go-tos.
For the Vanilla Glaze
Confectioners’ sugar (1 cup / 120g) — Sifted. This is important to avoid lumps in your glaze. Lumps are a nightmare.
Heavy cream or milk (2-3 tablespoons) — Start with 2 tablespoons. You can always add more. Heavy cream makes it richer, milk makes it lighter.
Vanilla extract (½ teaspoon) — For the glaze flavor.
Pinch of salt — Just a pinch to cut the sweetness.
Equipment Needed
You don’t need a fancy kitchen for this. Here’s what I actually use:
Large mixing bowl — Any size that can hold all the ingredients. I use a glass bowl because I can see through it.
Electric mixer — Hand mixer or stand mixer. I prefer hand mixer for this because the dough comes together quickly, and I don’t want to wash a big stand mixer bowl. But if you have one, use it.
Paring knife or small spoon — To make the thumbprint indentations. I use a small melon baller sometimes for uniformity, but a spoon works fine.
Baking sheets — Two standard sheets. I line them with parchment paper. Never bake these on bare metal; the sugar will stick and burn.
Piping bag or small ziplock bag — For the glaze. I cut a tiny corner off a ziplock bag and drizzle it over the cookies. It’s easier than dipping.
Cooling rack — Essential. Don’t skip this. Hot cookies + glaze = melted mess.
How to Make It: Step-by-Step
Alright, let’s get baking. This process is straightforward, but timing matters.
Step 1: Prep Your Oven and Pan (5 minutes)
Preheat your oven to 350°F (175°C). Line two large baking sheets with parchment paper. I find that parchment prevents sticking better than silicone mats for these sugary cookies. Set them aside.
Step 2: Cream the Butter and Sugar (3-4 minutes)
In your large bowl, beat the softened butter and granulated sugar together on medium-high speed. You want this to be light and fluffy, about 2-3 minutes. It should look pale yellow and airy. This step incorporates air, which helps the cookies spread nicely. Scrape down the sides of the bowl with a spatula to ensure everything is mixed evenly.
Step 3: Add Wet Ingredients (1 minute)
Add the egg yolk, vanilla extract, and almond extract. Beat on medium speed until combined. The mixture might look slightly curdled at first—that’s okay. It will come together when you add the flour.
Step 4: Mix in Dry Ingredients (2 minutes)
In a separate small bowl, whisk together the flour, baking powder, and salt. Gradually add this to the butter mixture on low speed. Mix just until the flour disappears. Do not overmix! Overmixing develops gluten, and you’ll end up with tough cookies. The dough should be soft but manageable.
Step 5: Roll and Indent (10 minutes)
Take a teaspoon of dough and roll it into a ball between your palms. Place it on the prepared baking sheet, about 2 inches apart. Use your thumb (or the back of a small spoon) to press a deep indentation into the center. You want it to be about ½ inch deep. If the dough cracks around the edges, just pinch it back together. It happens sometimes, especially if the dough is too cold.
Step 6: Fill the Cookies (5 minutes)
Use a small spoon or a piping bag to add about ½ teaspoon of raspberry jam into each indentation. Don’t overfill them, or the jam will spill over and burn. I usually fill them while they’re still on the tray. If the jam is too thick, warm it up slightly in the microwave for 10 seconds to make it easier to pipe.
Step 7: Bake (12-14 minutes)
Bake in the preheated oven for 12-14 minutes. You want the edges to be lightly golden, but the centers should still look soft. They will firm up as they cool. If you bake them until they look done in the oven, they’ll be dry. Pull them out when they’re just barely set.
Step 8: Cool Completely (30 minutes)
Let the cookies cool on the baking sheet for 5 minutes, then transfer them to a wire rack to cool completely. This is crucial. If you glaze them while they’re warm, the glaze will melt off and make a mess.
Step 9: Make the Glaze and Decorate (5 minutes)
Whisk together the confectioners’ sugar, 2 tablespoons of heavy cream, vanilla, and salt until smooth. If it’s too thick, add another teaspoon of cream. If it’s too thin, add a bit more sugar. Place the glaze in a ziplock bag, cut a tiny corner, and drizzle it over the cooled cookies. You can also dip the top of each cookie into the glaze, but drizzling is faster and looks rustic.
Let the glaze set for about 15 minutes before serving. They are ready to eat!
Expert Tips & Tricks
Here’s everything I’ve learned from making these dozens of times. These tips will save you from my mistakes.
Chill the Dough if It’s Sticky
If your kitchen is warm, the dough might be too soft to roll. Pop the bowl in the fridge for 15-20 minutes. Cold dough is easier to handle and keeps its shape better in the oven. I learned this the hard way when my first batch looked like sad puddles.
Don’t Skip the Parchment
I tried baking these on a bare sheet once to save on cleanup. The sugar caramelized and stuck to the pan, and I lost half the cookies trying to scrape them off. Parchment paper is your friend. It also helps them bake evenly.
Use Seedless Jam for a Neater Look
If you use jam with seeds, they can burn in the oven and look speckled. Seedless jam gives you that smooth, jewel-like center. If you only have jam with seeds, strain it through a fine-mesh sieve first. It takes a minute but looks so much better.
Glaze Consistency is Key
The glaze should be thick enough to coat the back of a spoon but fluid enough to drizzle. If it’s too thin, it will run off the cookie. If it’s too thick, it will crack. Adjust with tiny amounts of cream or sugar.
Store Properly
These cookies keep well in an airtight container at room temperature for up to 5 days. Layer them with parchment paper so they don’t stick together. If you live in a humid climate, add a piece of bread to the container to keep them soft.
Variations & Substitutions
Once you’ve nailed the basic version, here’s how you can mix it up. I’ve tried all of these.
Lemon-Almond Version
Swap the raspberry jam for lemon curd. The combination of almond and lemon is classic and bright. Add a bit of lemon zest to the dough for extra flavor.
Chocolate-Raspberry
Add 2 tablespoons of cocoa powder to the dough for a chocolate almond cookie. The raspberry jam cuts through the chocolate nicely. It’s like a fancy raspberry truffle in cookie form.
Apricot-Thyme
Use apricot jam and add a pinch of dried thyme to the dough. This is a more sophisticated, savory-sweet flavor. Great for fall or winter.
Gluten-Free
Use a 1:1 gluten-free flour blend. The texture will be slightly more crumbly, but they still taste great. I’ve used Bob’s Red Mill and it works well.
Dairy-Free
Use vegan butter and almond milk for the glaze. The texture might be slightly different, but the flavor is still delicious. I made these for a friend with a dairy allergy, and she loved them.
Serving & Storage
How to Serve
I usually serve these on a wooden board or a nice ceramic platter. They look beautiful scattered with a few fresh raspberries or almond slices on top. They are perfect for afternoon tea, holiday gifts, or a dessert after dinner. Pair them with a cup of coffee or tea—maybe try a homemade vanilla sweet cream cold foam iced coffee to go with them. The cold coffee contrasts nicely with the warm cookie flavors.
Storage
Store in an airtight container at room temperature for up to 5 days. If you want to keep them longer, freeze the unbaked dough balls. Place them on a baking sheet, freeze until solid, then transfer to a freezer bag. Bake from frozen, adding 1-2 minutes to the bake time.
Reheating
If you have leftovers (unlikely), warm them in the oven at 300°F for 5 minutes. The glaze might melt, but the cookie will be soft and fresh-tasting.
Nutrition Information
I’m not a nutritionist, but here’s the breakdown if you’re tracking. These are indulgent cookies, so enjoy them in moderation.
Per Cookie (makes about 24 cookies):
- Calories: 140
- Protein: 1.5g
- Carbs: 18g
- Fat: 7g
- Sugar: 12g
These cookies are higher in sugar and fat due to the butter and jam, but they are also a decent source of energy. If you’re watching your intake, stick to one or two cookies. They are rich, so a little goes a long way.
Final Thoughts
So that’s my take on these buttery raspberry almond thumbprint cookies with vanilla glaze. I know I’ve talked a lot, but when you make a recipe this often, you have a lot to say about it. These cookies have become a staple in my baking rotation. They are elegant enough for guests but simple enough for a Tuesday night treat. My kids love helping me press the thumbprints, and my husband always asks for more.
Make it yours! Try different jams, add nuts, or adjust the glaze thickness. The best recipes are the ones you adapt to your tastes. If you make this, drop a comment and let me know how they turned out! I love hearing from you. And if you need more easy dessert ideas, check out my homemade churro cheesecake bars next—they are just as addictive.
Happy baking! I hope your kitchen smells amazing and your guests are impressed.
Frequently Asked Questions
Can I use fresh raspberries instead of jam?
Yes, but you’ll need to cook them down first. Simmer fresh raspberries with a little sugar and lemon juice until they break down and thicken into a jam-like consistency. Let it cool completely before using. Store-bought jam is just easier and more consistent.
Why did my cookies spread too much?
This usually happens if the butter was too warm or melted. Make sure your butter is softened but still holds its shape. Also, don’t skip chilling the dough if it feels sticky. Cold dough spreads less.
Can I freeze the baked cookies?
You can, but the glaze might get sticky or melt when thawed. It’s better to freeze the unbaked dough balls. Bake them fresh when you need them. The flavor and texture are best when fresh.
What if I don’t have almond extract?
You can omit it, but the cookies will lose their signature flavor. You could substitute with another extract like vanilla or almond flavoring, but almond extract is really the key to this recipe’s identity. If you can’t find it, check the international aisle of your grocery store.
How do I prevent the jam from burning?
Don’t overfill the indentations. If the jam touches the hot baking sheet, it will burn. Keep the jam contained within the cookie dough. Also, watch the oven closely; if your oven runs hot, the jam might darken quickly.
Can I make these ahead for a party?
Yes! Make the dough, roll it, fill it, and freeze the unbaked cookies. Bake them fresh the day of the party. They will taste just as good as fresh-baked, and you’ll save yourself a lot of stress on the day of.
Is there a substitute for heavy cream in the glaze?
You can use milk, but the glaze will be slightly less rich. Half-and-half is a good middle ground. If you are dairy-free, use coconut cream or oat cream. The flavor will change slightly, but it will still work.
Pin This Recipe!

Buttery Raspberry Almond Thumbprint Cookies with Vanilla Glaze
- Total Time: 45 minutes
- Yield: 24 cookies 1x
Description
Elegant yet simple thumbprint cookies featuring a tender, nutty almond dough, a bright raspberry jam center, and a sweet vanilla glaze. Perfect for dinner parties or last-minute dessert needs.
Ingredients
- 1 cup (226g) unsalted butter, softened
- 1 cup (200g) granulated sugar
- 1 large egg yolk
- 1 teaspoon vanilla extract
- ½ teaspoon almond extract
- 2 cups (250g) all-purpose flour
- ½ teaspoon baking powder
- ½ teaspoon salt
- ½ cup seedless raspberry jam
- 1 cup (120g) confectioners’ sugar, sifted
- 2–3 tablespoons heavy cream or milk
- ½ teaspoon vanilla extract (for glaze)
- Pinch of salt (for glaze)
Instructions
- Preheat oven to 350°F (175°C). Line two large baking sheets with parchment paper.
- In a large bowl, beat the softened butter and granulated sugar on medium-high speed until light and fluffy (2-3 minutes). Scrape down the sides of the bowl.
- Add the egg yolk, 1 teaspoon vanilla extract, and almond extract. Beat on medium speed until combined.
- In a separate small bowl, whisk together the flour, baking powder, and salt. Gradually add this to the butter mixture on low speed, mixing just until the flour disappears. Do not overmix.
- Roll teaspoon-sized amounts of dough into balls. Place on prepared baking sheets, 2 inches apart. Press a deep indentation (about ½ inch deep) into the center of each ball with your thumb or the back of a small spoon.
- Fill each indentation with about ½ teaspoon of raspberry jam. If the jam is too thick, warm it slightly in the microwave.
- Bake for 12-14 minutes, until edges are lightly golden but centers still look soft.
- Let cookies cool on the baking sheet for 5 minutes, then transfer to a wire rack to cool completely.
- Whisk together confectioners’ sugar, 2 tablespoons heavy cream, ½ teaspoon vanilla extract, and a pinch of salt until smooth. Adjust consistency with more cream or sugar if needed.
- Place glaze in a ziplock bag with a tiny corner cut off. Drizzle over cooled cookies.
- Let glaze set for 15 minutes before serving.
Notes
Ensure butter is softened but not melted. Chill dough if it is too sticky. Use seedless jam for a neater appearance. Store in an airtight container at room temperature for up to 5 days. Can freeze unbaked dough balls for later baking.
- Prep Time: 30 minutes
- Cook Time: 14 minutes
- Category: Dessert
- Cuisine: American
Nutrition
- Serving Size: 1 cookie
- Calories: 140
- Sugar: 12
- Sodium: 100
- Fat: 7
- Saturated Fat: 4
- Carbohydrates: 18
- Protein: 1.5
Keywords: thumbprint cookies, raspberry almond cookies, vanilla glaze, easy dessert, party cookies, make-ahead dessert, gluten-free option


